27.7.11

Coconut Milk Panna Cotta


This is a practically perfect dessert - it is incredibly simple, delightfully fast, reasonably impressive and (almost) good for you. (Okay - maybe not quite good  for you but at least it isn't bad.) Delicious too, but then it is dessert which is by definition yummy. The first time I made it I followed a recipe, used cream and buttermilk, and couldn't get enough. This last time I didn't have enough cream in the fridge and absolutely not a drop of buttermilk but it was just what I wanted to have for dessert. Coconut milk to the rescue - again.

I have had these lovely little soba cups forever and rarely use them. They are so perfect for panna cotta that they may become "the panna cotta cups" forevermore.

Coconut Milk Panna Cotta

2 cups heavy cream
1 1/2 cups coconut milk*
1/3 cup honey
1 vanilla bean, split and scraped
pinch of sea salt
2 packets powdered gelatin
6 Tbsp cold water

Heat the cream and honey over medium heat, just until steaming. Remove from heat. Add the vanilla bean and seeds. Cover and let infuse for 30 minutes. Remove the bean and reheat the mixture. Add the salt.

Meanwhile sprinkle the gelatin over the cold water  in a small bowl and let stand for 5 minutes or so. Add the gelatin to the cream mixture and stir until the gelatin is completely dissolved. Add the coconut milk and stir to mix.

Pour the panna cotta mixture into eight custard cups (or ramekins, or tea cups, or something like that) and chill in the fridge until firm - about 2 hours. 

To unmold, run the tip of a sharp knife around the edge of the cups to loosen the panna cotta and unmold onto individual plates. Serve with fruit. (I decided to buck tradition and leave the panna cotta in the molds.)

If you have never tried fresh strawberries with balsamic vinegar and black pepper, now would be the perfect time. It certainly is not a new concept but if you haven't tried it, throw caution to the winds and live dangerously. You might be pleasantly surprised.


Strawberries with Balsamic Vinegar and Black Pepper
2 cups fresh strawberries, hulled and sliced
4 tsp balsamic vinegar
1 tsp honey
1/2 tsp freshly ground pepper

Toss the strawberries with the vinegar, honey and pepper. Let stand 30 minutes. Spoon over the panna cotta and serve. 

* Once again - the 'fresh' coconut milk from the dairy case. 


24.7.11

Green Bean, Tomato, and Chickpea Salad


I like green beans. A lot. I always have and I thought everyone else did too. When David and I got married I quite naturally cooked the things that I thought were delicious and so I cooked beans often. Imagine my surprise when I found out (much later) that David in fact did not like beans. At least he hadn't before we were married. He does now - although that may have been simple defeat or self-defense. I think beans are absolutely yummy lightly steamed with a bit of butter and salt but they also "clean up" very nicely - as in this salad. I first had it when Hannah  made it for my birthday a few weeks ago. It was so good that I have been anxious to make it myself and today was the perfect day for that. I made a few simple changes to the recipe to take advantage of the fresh garden herbs and what I had on hand. So, so good. A definite 'make-again'.


This would feed four quite nicely as a vegetarian main course. The addition of some grilled chicken breast and corn bread made 6 adults and 5 "littles" very satisfied at our table today.


Green Bean, Tomato, and Chickpea Salad
(adapted from Everyday Food - June 2011)


1 1/2 lbs fresh green beans
1 lemon, zest and juice (about 3 Tbsp juice)
2 Tbsp extra virgin olive-oil
1/2 tsp sea salt
1/2 tsp freshly ground black pepper
2 cups cherry tomatoes, quartered
3 whole green onions, thinly sliced
1 (19 oz) can chickpeas, drained and rinsed
1/2 cup crumbled feta
2/3 cup roughly chopped fresh parsley leaves
1/4 cup chopped fresh oregano


Cook the green beans in a large pot of boiling salted water until crisp-tender. (Don't over cook the beans - you really want them crisp and a nice bright green as opposed to limp and gray-ish.)  Drain and rinse under cold water to stop the cooking. 


In a large bowl whisk together the lemon juice and zest, sea salt, pepper, and olive oil. Stir in the tomatoes, onion, and chickpeas. Add the parsley, oregano, and feta. Arrange the green beans on a serving plate and top with the tomato mixture.

21.7.11

Simple Cole Slaw


Cabbage is one of those things that we should all eat lots of and I can't think of a better way to eat cabbage than in cole slaw. Fast, easy, yummy..... and fool proof!! Doesn't get much better than that. A recipe for cole slaw seems almost as silly as having a recipe for cooking frozen corn - basically unnecessary. You have your shredded cabbage and add (or don't) some shredded carrots, perhaps some green onion, and the dressing. Of course, one can be quite inventive but that's the basic idea. What makes this cole slaw recipe worth the time to read let alone make is the dressing. It is a creamy cole slaw dressing but full of stuff that is good for you - and it tastes amazing. We had this for dinner* tonight and the two of us ate almost every bit of it. It is really that good.


Simple Cole Slaw


2 medium carrots, shredded
1/2 head of green cabbage, cored and sliced very thinly
3 green onions, white parts sliced thinly
1/2 cup raisins


Dressing
1/3 cup plain Greek yogurt
2 Tbsp extra virgin olive oil
2 Tbsp honey
1 Tbsp apple cider vinegar
1/2 tsp sea salt


Whisk the dressing ingredients together and pour over the slaw ingredients. Toss and enjoy. This saves well for a day or two (in my opinion) - if you are lucky enough to have any left.


*We also had some rotisserie chicken the "Korean way" - at least it's the way my nephew taught us and he lived in  Korea. Basically, shake a little pile of sea salt on your plate and then grind a bit of fresh black pepper over that. Dip your chicken in the salt and pepper and go crazy! Anyway, it's a pretty easy meal for a laid back summer evening. Follow up with a bit of watermelon - or a square of your favorite dark chocolate - and you're good. And healthy too.

18.7.11

Dark Chocolate Cake


This cake is so easy and so good that I made it twice last week. Both times for Deacon's birthday - once on The Day and then again yesterday for his Family Birthday Dinner (a tradition at our house where everyone who can gathers). Both times there was way too much going on before the cake was cut to take a picture and very little left after. I figured that perhaps that would be a good enough endorsement.

As in the case of the Lemon Bars with Coconut I know there are tons of chocolate recipes everywhere you look - many even claim to be the best cake "ever". Having not tasted most of them I can't argue but Deacon rated this as the very best chocolate cake he has ever had, and at the ripe old age of eight he can be trusted as an experienced cake connoisseur. (David did agree with him and as he is a considerably more seasoned chocolate cake tester/lover you might want to give his opinion a bit more weight.) From my perspective all I can say is that I think everyone needs this recipe in their repertoire because it is so, so, so much better than a nasty boxed cake mix and absolutely as fast and easy. Faster probably since you most likely have all the ingredients in your pantry and won't even need to go to the store to buy the mix!

I made a single recipe and it was perfect for a 9" round cake pan. It doubles easily and well to make a two layer cake (two 9" pans), three layer cake (three 8" pans) or one 9"x13" cake. It also makes fantastic chocolate cupcakes. And you can crumble it to bits to make 'cake pops' from scratch (instead of using a mix). So see - you do need this recipe. 

Dark Chocolate Cake

1 cup white sugar
3/4 cups + 3 Tbsp flour
1/4 cup + 3 Tbsp cocoa powder
3/4 teaspoons baking powder
3/4 teaspoons baking soda
1/2 teaspoon salt
1 eggs
1/2 cup milk
1/4 cup coconut oil
1 1/2 teaspoons vanilla extract
1/2 cup boiling water

Heat oven to 350°F. Grease a 9" round pan and line the bottom of the pan with a parchment circle cut to fit.

Whisk together sugar, flour, cocoa, baking powder, baking soda and salt in a large mixer bowl. Add eggs, milk,  coconut oil and vanilla; beat on medium speed of mixer for 2 minutes. Pour in boiling water and mix carefully - the batter will be quite thin. Pour batter into prepared pan.
Bake  for 30 minutes or until wooden pick inserted in center comes out clean. Cool 10 minutes on a wire rack, then turn the cake out of the pans. Cool completely before frosting.*

*I made the frosting by beating together:
1/2 cup unsalted butter
1/2 cup Dutch process cocoa
2 1/2 - 3 cups (depending how stiff you want it) powdered sugar
(about) 1/2 cup of coconut milk
1 tsp vanilla
1/8 tsp sea salt

I slathered the frosting only on the top of the cake (letting it go "outside the lines" and over the edges a bit) and topped the frosting with a think layer of Oreo crumbs. It was pretty messy to be sure but oh my! it was worth it. Yes it was.

17.7.11

Lemon Bars with Coconut


May as well boast (rather than moan). In Calgary our summers are so "moderate" that we can even bake in July. There. Isn't everybody envious? So I took advantage of that yesterday and baked a pan of Lemon Bars. I realize that recipes for Lemon Bars are not particularly obscure but I promise that this recipe is one of the very best that I have ever licked my fingers over. The addition of coconut to the buttery crust is brilliant. Use fresh lemons - not bottled lemon juice - and you won't regret turning the oven on (no matter where you live).


Lemon Bars with Coconut
( barely tweaked from Bon Appetit Desserts)


Crust
1 cup flour
1/4 cup sugar
1/4 tsp salt
3/4 cup sweetened flaked coconut
6 Tbsp chilled unsalted butter, cut into 1/2" cubes


Preheat oven to 350 F. Line 8x8 inch baking pan with parchment paper, leaving an overhang on two sides of the pan. Blend flour, sugar, and salt in food processor. Add the coconut and butter cubes; process until mixture resembles fine meal and begins to clump together. Press dough evenly over the bottom of the prepared pan. Bake 25 minutes or until the crust is just golden at the edges.


Filling
3/4 cup sugar
2 large eggs
1/4 cup fresh lemon juice
1 1/2 Tbsp finely grated lemon peel
1 tsp flour
1/2 tsp baking powder
pinch of sea salt


Combine eggs, lemon juice, lemon peel, flour, baking powder, and salt in food processor. Blend filling until smooth.


Remove the crust from the oven and pour filling evenly over the hot crust. Return to oven and bake until the filling begins to brown at edges and is just set - about 30 minutes. Cool completely on a rack. When cool remove the bars from the pan with the aid of the parchment paper and cut into squares.


Lick your fingers - I dare you not to! - but try not to lick the knife ;)

12.7.11

Cut Grass


The smell of freshly cut grass just makes me breath deeply - I want to fill my nose with it and save it. Smells really don't save but the grass grows quickly, giving me the opportunity to try to get my fill each time I mow the lawn. We have a reel (or push) mower, just like the one my father used when I was a child. Using it is an Experience. Really. It is certainly more physical than using a power mower - increasing heart rate and actually using muscle to get the job done. For me the experience includes wonderful memories; waking early with the sun, feeling secure and happy in my bed, my dad whistling, the whir of the mower as he cut the grass. As I push the mower along I feel connected to him. I remember the tremendous sense of accomplishment I felt the first time I mowed the lawn - we had a very large lot and it was a ton of work for someone under the age of 12. I can't imagine that I did a very good job that first time but I felt good about the job I did and although I am sure my dad would have loved to go over the lawn so that it did look good he was wise enough to let me feel proud of what I had done.

I love working in the garden - the weeding, the harvesting, the nurturing - but cutting the grass is probably the garden chore that I enjoy the most. It takes time with a good old-fashioned reel mower - a job that really cannot be hurried or short-cut. And that reminds me each time to slow down and take the time to savor not only cutting the grass but whatever it is that I am doing. Because if I choose to do it I should choose to do it well, and doing it well almost always means being mindful, taking care, and finding satisfaction in doing my best.


10.7.11

Rhubarb Pie


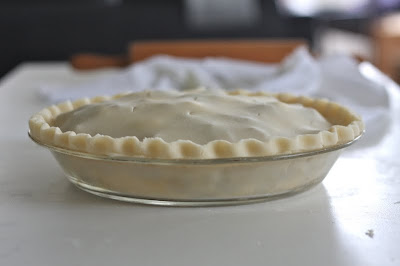
My very , very favorite pie - ever, in the whole world - is Rhubarb Pie. Just plain rhubarb pie. Not Strawberry-Rhubarb Pie. But rhubarb in its tart and tangy glory all by itself. Nothing is better. Other things may possibly be as good but for my taster nothing is better. Every spring I see at least one or two recipes published in magazines for rhubarb mixed with something (as if it is not even edible without another - better? - fruit), always the understudy, never the star. A concept that leaves me scratching my head because I absolutely love simple Rhubarb Pie. In the hope that I can help to raise the profile of my beloved favorite at least a little I am sharing the recipe that I have made and loved my whole life. It is easy and old-fashioned and tastes amazing warm from the oven with a scoop of good vanilla ice cream melting on the side.

Rhubarb Pie
(10-inch two-crust pie)

Pastry

2 cups flour
1 tsp salt
1 cup lard 
1 Tbsp cold water
2 Tbsp vinegar
1 egg

Mix the salt and flour together well. Cut the lard into the flour and salt until the mixture is rough and the bits are the size of small peas.

Whisk together the cold water, vinegar, and egg. Pour over the flour mixture and mix quickly and lightly with a fork until the mixture comes together loosely. Gather it into a ball. Divide the ball in two equal parts. Roll one half into a circle with a rolling pin on a flour dusted pastry cloth and fit into a 10-inch pie plate.

Filling
5 cups cut-up fresh rhubarb (cut into 1/2" lengths)
1 3/4 cups sugar
1/2 cup flour
1/2 tsp nutmeg
3 Tbsp butter

Stir together the flour, sugar and nutmeg. Arrange the cut-up rhubarb in the pastry lined pie plate. Pour the flour mixture over the rhubarb - the mixture will sift down through the rhubarb pieces. (Gently shake the pie plate to facilitate the sifting and use your fingers to coax the flour mixture more or less evenly over the filling.) Dot with the butter. Cover with the remaining pastry which has been rolled out on a pastry cloth. Seal the edges and flute. Cut slits in the top to allow steam to escape.

Bake for 40-50 minutes at 425 degrees F. Pie is done when the top is browned and the juices bubble up through the slits in the pastry crust.*


*I have learned to bake this pie with a cookie sheet under it to catch the almost inevitable overflow. It is a juicy, delicious pie but makes a mess of the oven unless you take this precaution.

7.7.11

Honey Rhubarb Sorbet


One of the few advantages of gardening in Calgary is that the rhubarb season is long. In some disadvantaged locations rhubarb grows for only a short time in the early spring but here, rhubarb produces all summer long. (Not that summer is all that long I must admit but, there you go, one must learn to look on the bright side after all.) So while some people in more garden friendly parts of the world are wondering what to do with an abundance of various produce, I am having fun trying to keep up with the star (and sole) producer in my garden - the rhubarb plant! 

This sorbet is - simply - wonderful. The sweetness of the honey balances the tartness of the rhubarb without being sicky-sweet and the vanilla scent tips it right into amazing. A drizzle of fresh cream or coconut milk makes it perfect. Easy and absolutely yummy.

Honey Rhubarb Sorbet
(adapted from iced - 180 very cool concoctions)

8 cups sliced rhubarb (1/2 inch pieces)
1 cup honey
1 1/4 cups water
1 vanilla bean

Put the rhubarb, honey and water into a large saucepan over low heat. Stir gently until the honey is mixed in and the rhubarb begins to soften. Add the split and scraped vanilla bean. Bring to a boil, then reduce heat and simmer for about 5 minutes - or until the rhubarb is very soft. Remove from heat, cool slightly and then remove the vanilla bean. Puree with an immersion blender (or food processor). Refrigerate for several hours or until thoroughly chilled. Transfer to an ice cream maker and freeze according to the manufacturers instructions. When the machine is done, transfer the sorbet to a freezer-safe covered container or serve immediately drizzled with fresh cream or coconut milk.*


*Once again I used the So Delicious brand fresh coconut milk. It's a good choice if you have issues with dairy - or if you simply want a healthier choice than cream. But I have to tell you the cream is pretty good too.


1.7.11

A Tiny Coconut Cake for Sweet Ysa


Ysa is ONE!! today. I had the fun of making her first birthday cake and I must admit that I am ridiculously pleased with it -  the sweetest  tiny, practically perfect, coconut cake! None of the recipes I read for coconut cake seemed quite what I was looking for so I tried my luck with my own version. A wiser and more reasonable person would almost certainly have chosen to either go with a tested recipe or .... I can't think of another reasonable choice. I am clearly at least a bit unwise (I refuse to admit to ever being unreasonable) because despite knowing that there was time for just one try I forged ahead and experimented. Silly time to experiment. Driving over to Eden's with the admittedly adorable tiny cake layers on the seat next to me, I was suddenly very aware of how foolhardy my 'bravery' truly was. The batter was delicious but did that really mean the cake wouldn't be a dry, nasty mess?


You know the end of the story (I am less than likely to chronicle a total failure) - the cake was really good! Even trying to be modest, I have to tell you that this was totally delicious. It was also fast and easy unlike some of the recipes I read - many of which seemed to be coconut cakes only by virtue of having a little coconut sprinkled on the top or a can of coconut cream in the batter. This cake is moist and richly, delightfully, coconut-y. The coconut pressed into the Cream Cheese Icing is almost gilding the lily. Almost but not quite.


Coconut Cake
( makes one adorable tiny cake)

1/3 cup coconut oil
1 cup sugar
1 egg plus 1 egg white
3/4 cup coconut milk*
1 tsp vanilla
1 tsp organic coconut extract
1 1/2 cups flour
2 1/2 tsp baking powder
1/2 tsp sea salt

Grease two 6" round cake pans. Line the bottoms of the pans with parchment circles cut to fit.  Preheat oven to 350 degrees F.

Melt the coconut oil. In a medium size mixing bowl combine the sugar and melted coconut oil. Beat until well combined. It will look somewhat grainy. Add the egg and egg white. Beat for 1 minute. Add the coconut milk and both extracts, mixing well. Add the dry ingredients, again mixing well. Spoon into prepared pans and bake for 30-35 minutes or until a toothpick inserted into the center of the cake comes out clean. 

Note:The cake rises nicely but is quite pale so don't judge the degree of done-ness by the color or you may end up with the dreaded dry mess.

Cool the cake for 5 minutes and then remove from pans and cool completely on a wire rack.

*I use the So Delicious brand of coconut milk that you can find in the refrigerated dairy section but any canned coconut milk - not coconut cream which has added sugar and is quite sweet - would also work.

Cream Cheese Icing

1 8 oz package of cream cheese
2 Tbsp butter
1 tsp vanilla
2 tbsp coconut milk
3 1/2 cups powdered sugar

Beat cream cheese, butter, vanilla, and coconut milk together until smooth. Add the sugar in 1 cup amounts and beat well. Fill and frost the tiny layers and press shredded coconut into the icing. Done! One tiny, sweet cake for the sweetest, tiny, most adorable girl.


There will be plenty of icing left over to make some yummy Wonders.