27.9.11

fresh peach pie


I know it may be a bit late but if there is any chance you can still get  your hands on some of the season's last fresh peaches, you have to try this pie. My sweet friend Rebekah sent me the recipe. I tried it, loved it, tweaked it and loved it some more. We had this twice in 3 days and I think if I made it again tonight there would still be none left. It is incredibly simple to make - the kind of thing that is just right after a late summer meal of garden veggies. The recipe that Rebekah sent me called for a graham crust. That was really good and would perhaps be just what you want if it is hot and you are reluctant to turn on the oven. I decided to try it with a shortbread crust - it was just that bit better, so that is the version I am sharing.

fresh peach pie

crust:
1/2 cup sugar
2 Tbsp cornstarch
1 1/2 cups flour
1/2 tsp sea salt
3/4 cup unsalted butter, room temperature

Beat butter and sugar together until light and fluffy. Add cornstarch and salt, mix well. Add flour and beat until just blended. Using fingers, press dough firmly and evenly into greased 10" pie plate. Pierce dough all over with a fork. Bake at 350 F until cooked through and just golden - about 40 minutes. Cool on rack.

filling:
6 or 7 fresh ripe peaches
1 can sweetened condensed milk
1/4 cup fresh lemon juice
1 cup heavy cream

Wash, pit, and slice the peaches. (I never peel peaches unless I am canning them but if peach skin offends you...peel them. I figure I eat apple, potato, grape skin, etc, so why not get the goodness of peach skins? If you give the peaches a good  - gentle - rub while you are washing them, there is no nasty fuzz to eat.) Combine the peaches, sweetened condensed milk and lemon juice in a large bowl and mix well. Pour into the cooled crust and refrigerate for 2-3 hours. Just before serving whip 1 cup of heavy cream and spread over the pie.


If this is simply too late and the peaches are all gone - remember this and try it as soon as you can next year. I will be anxiously waiting for fresh peaches. Nuff said.


26.9.11

Just finished reading Sarah's Key by Tatiana de Rosnay. Couldn't put it down. Didn't want it to end. I love it when I have that experience - that absolute immersion in a book.

21.9.11

turning japanese?


Japan is as close to a second home for us as I can imagine. We lived in Osaka for 3 years with our five young kids. Had another short stint in the Osaka area a few years later. And another 3 years in Tokyo recently. When we lived in Takarazuka (our first stay) we were quite visible. Five very blonde children really caught the attention of the community. I don't know what was most interesting - the number of offspring I had, that they were blonde and blue-eyed, or that we are not Japanese - but we were more than a bit of a novelty for the time and place. I had great neighbors; women who were incredibly generous in helping me to learn (enough of) the ropes that I could function as an independent adult in a culture where I felt like an illiterate, deaf-mute child. (Definitely a mind-expanding experience.) They taught me to cook - wonderful traditional Japanese home-cooking, the kind of thing they made for their families at home. We still love - and love to eat - those meals. As I am always on the look-out for interesting and yummy recipes, when David was in Tokyo last month he asked for the recipe for some chicken meatballs that he had really enjoyed. His host happily obliged and David sent me the recipe by email. The "recipe" was so much fun that I decided it had to be shared.

Chicken  Meatball.
How to make
Chicken is minced meat.(Proper amount)
It's built up much.
Something to mix is free.
/レンコン(It's done briskly.)
or/ごぼう(Delicious.)
or/Egg(soft)
or/Ginger(Refreshing.)
or/Salt and pepper(Simple.)
As the above is put in the soup which boiled with a spoon.
It's OK in all soup.
PS:Various salt of a gift
    Please come to a stick of fresh greens and fry!
  
  Noodles are soup, minuteness can also be used.
  It's boiled and time is divided in two-, 3 minutes
    (Don't weaken soy sauce soup and please have straight.) 
Then I'm looking forward to the day when I can meet you again.
In literal translation English, I'm sorry.
♪*゜?。+*? ♪*゜?。+*? ♪*゜?。+*? ♪

Hilarious right? Or maybe you need to have some experience living in Japan. Whatever, I loved this. Makes me smile every time I read it. I doubt I will attempt it.

I do love the coasters that David brought back for me though. They are beautiful, thick, letter-pressed paper. I look at them often too. Not sure what I will do with them either but something more concrete than the recipe.

First photo is of Tsukiji Fish Market in Tokyo. It has recently been moved but it was the world's largest fish market and was totally amazing to visit.


19.9.11

apple, almond, & mascarpone tart


I have an apple crop! I admit it is modest but given the challenges of our growing season I am more than modestly excited. My little apples trees produced a (small) bucketful - Tada!! I am as proud as punch and very ready to make apple-whatever. Sadly, the apples are not the kind you want to eat out of hand (being super-tart) but they are wonderful when baked. We have already had an Apple Crisp, used a few in my favorite breakfast oats, and adapted a recipe that wanted pears but I thought my little apples would be pretty good - and they were. If you want to try it and don't have home-grown apples (I am really not bragging - well, kind of not) I am reasonably confident that a nice Granny Smith would work almost just as well.

Apple, Almond, and Mascarpone Tart
(adapted from Cinnamon, Spice, and Warm Apple Pie)

6 small green apples
4 Tbsp sugar
1/2 cup mascarpone
1 egg
1 Tbsp flour
2/3 cup slivered almonds

for the pastry:
1 1/2 cups flour
4 Tbsp sugar
1/2 cup unsalted butter, chilled and cubed

To make the pastry, put the flour and sugar in a food processor and pulse to combine. With the motor running, add the butter and 1-2 Tbsp cold water. Mix until the mixture resembles coarse crumbs and just begins to gather into lumps. Gently press the mixture into a lightly buttered 10" tart pan, covering the sides and bottom. Bake for about 25 minutes (until lightly browned) at 350 F. Remove from oven and cool slightly.

Meanwhile, peel, halve and core the apples. (Use a small spoon to scoop out the core.) Put the apple halves in a bowl filled with cold water and 2 tsp of lemon juice to keep them from going brown. Put the 4 Tbsp of sugar, the mascarpone, egg, and flour in the food processor and process to form a paste. Spread the mixture over the pastry. Arrange the drained apple halves over the top - pressing them into the paste. Scatter the almonds over the apples and sprinkle that with another 2 Tbsp of sugar. Bake at 350 F for 40-45 minutes. The apples should be soft and the mascarpone mixture set.


14.9.11

Making Bow Ties

In June Deacon asked me to make a bow tie - he wanted one for his baptism. David had recently cleaned out his tie collection and I had saved the discards for some future creative something .... and I made Deacon the most adorable little silk bow tie.


Deacon looked so dapper that we were inspired with a desire for our three little boys to have bow ties to wear at Mark and Tiffany's wedding. Mark was planning to wear one so it seemed perfect. Eden snagged an old tie of Daylan's that went well with the wedding colours, I spent an afternoon, and we had the ties. 

It is really ridiculously simple to make these. No machine sewing is required and pretty much no skill either - just a tiny bit of patience, an old tie, a needle and thread, hook and eye, and a piece of elastic. Here's how I did it:

Cut the hand stitching on the back of the tie so that it can be opened up. Pull out the interfacing and press the tie fabric open and flat.


I used a cutting mat, rotary blade and ruler to cut my rectangles (so that they were nice a even) but simple scissors would work well also. I wanted the ties to be quite discreet and dapper not clownish so I made them narrow. For Deacon's tie* I cut one piece 7.5" x 3" for the body of the tie. For the 'knot' I cut another piece also 7.5" long but only 2" wide. On one long edge (of the 'tie' piece) press a 1/2" fold. On the 'knot' piece, press 1/2" fold on both long edges and then fold the edges together and press again. (See above)


Cut a piece of the old tie's interfacing just slightly longer than your tie fabric and about 1" wide. Lay the interfacing on the wrong side of the tie fabric and fold the edges together with the fold on the top. Slipstitch the seam closed. 
[Update: it is tempting to skip the interfacing but if you do the tie will be too flat and will definitely look cheap - so don't!]

(Note: If the tie you have chosen is narrower and the skinny end of the tie is very straight you can simply cut the tie and interfacing into the length you want and carry on from here.)


Join the ends to make a ring and sew together - it doesn't need to be pretty because it will be covered.


Keeping the seam you have just made under the center of the tie, pinch it all together to make a bow. Be a bit careful here on two counts - you want to be sure that your knot will be in the middle of the bow, and check that it looks like it might actually have been tied. It is a"clip-on" so to speak but you don't want it to look blatantly phoney. Take a few stitches through the center to secure it.


Without cutting the sewing thread attach the 'knot' fabric to the bow (above). Attach it securely because you need to use a bit of tension to make the knot. Cut a piece of 1/4" elastic to go around the neck. Be generous with the length remembering that it needs to go under a shirt collar that likely won't fit your boy's neck snuggly. You will cut it to the right length when you 'try it on'. Lay this piece of elastic between the bow and the knot pieces. Keep the thread out of the way and wrap the knot piece around the bow and elastic. I twisted mine - again to try to make it look as 'real' as possible - as I came around the front of the bow. It might take a bit of fiddling to get the look you want. Cut the fabric, fold under the very end and sew the ends together neatly.


Try the tie on to determine the length of the elastic, adding 1". Fold under 1/2" on each end and sew on the hook and eye closure so you can fasten the tie. (Or you can skip this and use a safety pin but I recommend the closures for safety - ironically.) 

That's it! Finished. I can honestly say that it took longer to write this than it did to make one. Lots of fun to make these and very fun to see dapper little boys.

*I made each tie a different size because our little boys are different sizes. What looks perfect on an eight-year-old would look silly on an eight-month-old. I just imagined each little face above the tie and adjusted the length accordingly.


The boys looked incredibly handsome. I love the picture of Deacon. He was the ring-bearer and bore the rings in a tiny traditional handwoven Salish basket - very appropriate for a wedding at Capilano on the West Coast of Canada.

12.9.11

Beet Ice Cream


We love beets - top to bottom. Pickled, raw, steamed, or roasted, greens or root. The glamourous jewel colors. That delicious earthy flavour. And now Beet Ice Cream! I have to admit that when I saw the recipe I was intrigued but initially sceptical. Only initially though because as I read the recipe I was pretty sure it had to be amazing and it is! The colour is only the introduction to the greatness - and it is a really great colour. Every single person at our table (regardless of age or general attitude to vegetables) absolutely loved this ice cream. Lots of mmmmms... and not much else was going on for quite a few minutes. It tastes like beets but well, for dessert.


Beet Ice Cream with Mascarpone, Orange Zest, and Poppy Seeds 
(from Jeni's Splendid Ice Creams at Home by Jeni Bauer - tweaked just)


Makes about 1 quart


2 medium beets, roasted
2 Tbsp sugar
2 cups whole milk
1 Tbsp + 1 tsp cornstarch
1/4 cup mascarpone cheese
1/2 tsp sea salt
1 1/4 cup heavy cream
2/3 cup honey
Zest of 1 orange (remove in a long strip with a vegetable peeler)
2 Tbsp poppy seeds


Roast the beets (in a 450 F oven wrapped in foil) for about 1 hour or until very soft. Remove them from the oven and cool slightly. Rub the skins to remove them, then puree the beet flesh in a food processor. Add the 2 Tbsp of sugar and continue to puree until very smooth. Measure 1/2 cup of the puree and discard any extra.


Whisk together about 2 Tbsp of the milk with the cornstarch. Combine the cheese, beet puree and salt in a medium bowl until smooth.


Combine the remaining milk, cream, honey, and orange zest in a 4 qt saucepan and bring to a rolling boil - boil for 4 minutes. Remove from the heat and whisk in the cornstarch mixture. return to a boil and boil for about 1 minute - until slightly thickened. remove from the heat.


Gradually whisk the hot milk mixture into the beet mixture until smooth. Chill thoroughly. (You can put the mixture into a large Ziploc bag and then into an ice bath to speed the process if you are anxious.) Before freezing remove the orange zest and add poppy seeds. Pour the mixture into the freezer canister and spin until thick and creamy. Pack into a container and freeze in the freezer compartment of your fridge until  firm, about 4 hours.


9.9.11

Summer Days on the Farm


A patient old horse. Hot sun and clear skies. Long days on the farm. Cousins. And the mountains just over there. That is the definition of my childhood summers. Both my parents were raised "on the farm" and although I was certainly a city kid (to my shame), I spent a lot of time with my grandparents and cousins wishing - and kind of pretending - I was not a city kid. It seems as though most of my many cousins were boys - they certainly outnumbered Lorna and I. So we stuck together and whenever we could manage it we rode Flicka - a beloved old mare; patient, gentle, and well-accustomed to little ones after close to 30 years of life. She let us scramble onto her bare back and generally went where we directed.

A few miles down the road (at my other grandparent's ranch) was old Baldy. Grandpa Bradshaw was not particularly imaginative when it came to naming his horses - Brownie, Blondie, Blaze, Pink, and Baldy being a few I remember. I learned to ride on Baldy. He was old and patient and probably too tired and lazy to get me into any trouble but one very memorable summer evening when I was 5 years old I had an Adventure on his broad back. 

It had been a beautiful hot summer day and the evening was lazy and golden. My dad and uncles were talking on the porch after dinner. Some of the family were walking around the pasture by the house with little bottles of grandma's homemade root beer. I was riding Baldy with my little brother on behind - pure heaven for me. Mike had a 'switch' in his hand and it was his job to persuade Baldy to keep picking up his feet - however slowly. Mike was not particularly into horses and - being bored - he was whiling the time by laying down on Baldy's rump and sitting up again (like sit-ups). Just as we went over a small ditch, he performed this feat of daring and "switched" the horse. Too much, too fast for old Baldy and he took off at what seemed to me to be a tearing pace. Mike slid off the rear end but I hung on for dear life. The barbed-wire fence was approaching alarmingly quickly and I was yelling "Daddy! Daddy!" at the top of my lungs (adding fuel to the fire behind Baldy). Although I was instructed to "Hold on" and could see my dad running to catch us I was certain that lazy old horse was going to jump the fence and that was just too scary....so I bailed. Into a pile of manure. At least that's how I remember it.

A couple of weeks ago we took Aubrie to Grandpa Bradshaw's old ranch (now my Uncle Dean's) so she could live her dream to ride a horse. Watching her on patient old (29 or 30-ish) Lady brought back so many wonderful memories. And walking behind or beside her I was overcome with awe for the beauty surrounding us that I absolutely took for granted as a child. I realized too how privileged I had been to be a city kid but have so much the pleasures of the country. To have spent long, lazy days on patient old horses and - at the end of a day's adventures - to go in to loving, kind, interested grandparents. I do believe I had the best, most golden, of childhoods. 


Lady is old, her coat is rough, the glossy beauty she once had gone but she was sweet and gentle and sure made a little girl happy. To Aubrie she was as pretty as the young sleek horses she shares a pasture with. Good lesson.

8.9.11

Meet the Real Rickety Uncle

I figure it is only right and good to share Nancy's mother's recipe for Rickety Uncle. I thought about adding it as a footnote to the Hacked Rickety Uncle post but that just wasn't right. A recipe as beloved and venerable as Rickety Uncle (not to mention the cool name) deserves a post of its own.


Rickety Uncle
(from Nancy Simpson)


1 1/2 cups brown sugar
1 cup melted butter (or margarine)
4 cups rolled oats
salt - around a teaspoon
vanilla or almond flavouring or both - 1 lid each


Melt butter and add dry ingredients which have been mixed together. Bake at 350. 15-25. Brown and bubbly.


And that is just exactly the way I got it from Nancy, which I am pretty sure is just the way it is written on the card in her file. I love those kind of recipes - the casual assumption cooks used to have that everyone knew how to cook and what the notes they had made would mean. I have a "cookbook' of my grandmother's that is full of recipes that are very similar; some are absolutely cryptic.


Anyway, enjoy Rickety Uncle or the hacked offspring. The relationship is not hard to find. I think it might be the butter and sugar (?!!) but these are super yummy. Like I said - we absolutely inhaled them!


And Nancy - thanks ever so much again.

7.9.11

Hacked Rickety Uncle


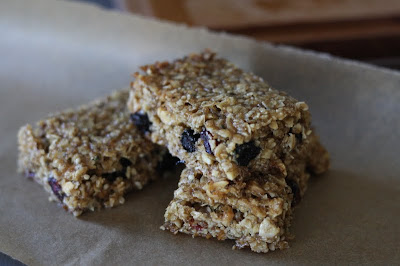
One of my very best best friends makes a totally yummy square that has been a Simpson family favorite (and a family recipe) for a couple of generations. When our entire gang was invited to spend the day* with their entire gang at their cabin on beautiful Worlcombe Island Nancy made Rickety Uncle for us. As you would entirely anticipate, something with a name that incredible must surely be more than good and it was. Every single little crumb was carefully sought out and inhaled. Rickety Uncle disappeared so fast that Daylan somehow didn't even get one of those crumbs. Nancy kindly shared the recipe with me. I love it exactly as it is but couldn't resist trying to put my own spin on it. My 'spin' ended up being more of a hack than a tweak, but it retains the flavour of the original with a lot more nutrition. I added some honey to replace some of the sugar and reaped the benefit of a more cohesive bar (the original is pretty crumbly). There is still a lot of sugar and butter in this version so it isn't exactly health food but it is a very healthy option as opposed to a purchased granola bar. 


It has also undergone rigorous taste-testing by my personal guard of small but very discerning tasters and has passed and exceeded all standards. Just so you know.


Hacked Rickety Uncle
(inspired by Nancy Simpson's family recipe)


3 1/4 cups quick oats
1/3 cup chopped almonds
1/4 cup hemp hearts
1/4 cup sprouted ground chia seed**
1/4 cup milled flaxseed
1/2 cup coconut
1/4 cup whole wheat flour
1 cup brown sugar
1 tsp salt
1/3 cup dried blueberries
1/3 cup dried cranberries
1/3 cup honey
1 cup melted butter
1 tsp vanilla
1 tsp almond extract (optional)


Mix the dry ingredients together. Pour the melted butter, honey and vanilla over and mix very well. Line a 9 x 13" pan with a sheet of parchment paper with the paper coming up the sides. Pour the mixture into the pan and pat very firmly. Bake at 350 F. for 25 minutes or until the squares are browned and bubbling. Cool in the pan on a wire rack. When cool, remove from the pan and cut into squares.


*Check out the pictures of our day there on Eden's blog (3.9.11 and 26.8.11)
**This "exotic" ingredient can be found at health food stores, is a bit pricey, and very healthy. You can skip it if you wish and substitute regular chia seed.

5.9.11

Double Chocolate Zucchini Muffins aka Chocolate Cupcakes


Theo, Jane, Deacon and Aubrie all bought that these muffins are cupcakes. Ysa opened really wide and ate all that I offered. But Kayden's response was absolutely the best; he was actually quivering with joy and couldn't push it in his mouth fast enough. (First chocolate of his life - his parents gave it to him, just so you know.) In defence of all the adults that fed their precious children chocolate cake you should know that it disguised zucchini, chia seed, flaxseed, and whole wheat flour in the coating of yummy, yummy dark chocolate.

Fast, easy, and very yummy, you need to try these muffin-cakes. Eat them for breakfast or dessert - with or without the Backyard Mint Ice Cream.

Double Chocolate Zucchini Muffins
(adapted slightly from 20 Minute Supper Club)

2 cups shredded zucchini
3/4 cup flour
3/4 cup stone ground whole wheat flour
1/2 cup oat bran
1 cup brown sugar
1/2 cup good quality cocoa
1/4 cup milled flaxseed
1/4 cup chia seed
1 tsp baking powder
1 tsp baking soda
1/2 tsp sea salt
2 tsp cinnamon
2 eggs 
1 1/4 cup buttermilk (or soured milk)
1/3 cup coconut oil
1 tsp vanilla
1 cup dark chocolate chips

Mix together the flours, oat bran, cocoa, flaxseed, chia seed, baking powder, baking soda, salt and cinnamon. 

In a separate bowl, whisk together the eggs, buttermilk, coconut oil, and vanilla. Pour over the dry ingredients and stir until dry ingredients are moistened. Add the shredded zucchini and chocolate chips and mix until combined. Spoon into 12 greased or paper-lined muffin cups. Bake at 375 F until the tops are firm to the touch, about 20-25 minutes. Cool in the pan on a wire rack for 10 minutes and then transfer to the rack to cool completely.


4.9.11

Licking the Paddle


I was the first grandchild on my mother's side. It is a pretty special place to be. Not that the first is more loved - it is just a unique position. (Like the 5th grandchild .... or the 22nd ... or, well, any single one.) But I felt special. I guess that is the magic of grandmother's, and Grandma Bradshaw was certainly one of the most magical and warm of grandmothers. I have a whole raft of golden memories of times spent at my grandparent's home on the ranch. Today the one I have taken out is of "licking the paddle". 

My grandmother was the oldest of 11 children and by the time I was on the scene, Grandma's house was the place for gathering - for her children, and all her siblings and their offspring. It was a happening place. In the summer when we were all together she almost always made ice cream (and root beer  - but that's another story.) She made her ice cream in an old hand-crank freezer with ice and salt and a whole lot of elbow grease. When I got a bit older she upgraded to an electric! freezer - still with the salt and cubed ice. There was often a choice between vanilla or chocolate for flavour. For all the kids though, flavour was irrelevant - the best part was when the ice cream paddle was pulled from the freezer. It would go on the same old platter every time and we would grab a spoon, elbow our way through the gang and get as much ice cream as we could before it was all gone (off the paddle at any rate.) It was a blast! Ice cream in a bowl was good but fresh off the paddle was somehow better.

We made ice cream today and the kids licked the paddle. I don't know if it was as much fun for them but they certainly went at it. I used some fresh mint from my garden and a terrific recipe from Jeni's Splendid Ice Creams at Home by Jeni Bauer*. My little electric ice cream freezer doesn't have nearly as cool a paddle as Grandma's did but together we sure made some delicious ice cream. It was smooth and creamy and rich and fresh. We licked the paddle clean and then the freezer too. 

Backyard Mint Ice Cream
(from Jeni's Splendid Ice Creams at Home by Jeni Britton Bauer)

2 cups whole milk
1 Tbsp plus 1 tsp cornstarch
3 Tbsp cream cheese, softened
1/2 tsp fine sea salt
1 1/4 cups heavy cream
2/3 cups sugar
2 Tbsp honey
A large handful of fresh mint from your back yard or farmer's market, leaves roughly torn into small pieces.

Mix about 2 Tbsp of the milk with the cornstarch in a small bowl. Mix the cream cheese and salt together until smooth.

Combine the remaining milk, the cream, sugar, and honey in a saucepan. Bring to a boil and boil for 4 minutes. Remove from heat and gradually whisk in the milk/cornstarch mixture. Return to a boil over medium heat and cook, stirring constantly until slightly thickened - about 1 minute. Remove from heat.

Whisk in the cream cheese mixture until smooth. Add the mint. (Tear the mint as you add it. This bruises the leaves and releases the scent into the cream.)Pour the mixture into a large zip-lock bag, seal and refrigerate to steep for 4 to 12 hours (I left mine overnight until late afternoon and it was amazing.)

Just before freezing strain the mint leaves out of the cream. Pour into the freezer canister and spin until thick and creamy. Pack the frozen ice cream into a storage container and seal with an airtight lid. Freeze in the coldest part of your freezer until firm.

We paired our Mint Ice Cream with some yummy (and healthy, shhhhh) chocolate muffins that I passed off as chocolate cupcakes. Check tomorrow for the recipe.

*This cookbook is full of drool-inducing, innovative recipes that I am anxious to try. Consider "Beet Ice Cream with Mascarpone, Orange Zest and Poppy Seeds" or "Sweet Potato Ice Cream with Torched Marshmallows". Even the tamer "The Darkest Chocolate Ice Cream in the World" sounds like a must-try. I absolutely recommend it.